CodeNode.Identity – An implementation of ASP.NET Identity
ASP.NET Identity is one of recent membership and identity management framework supported by Microsoft and this system can be plugged to any recent ASP.NET framework such as Web API, MVC, Web Forms etc. While I was trying to implement it, it took me some time to understand and configure it as it supports multiple functionalities related to user, role and account management, authentication, authorization, online activation etc. After grasping some understanding about this framework, I decided to create an abstraction over it, which can be quickly and easily consume in any .NET application with all generally required functionality with easy configurations and thats how CodeNode.Identity came into the existence. I will cover mainly following points here :
- How to consume
- Library features
- Things to do
- Nuget and source code links
How to consume
I have published this library on nuget.org (link at the end of article) so that I can easily consume in any .NET application. You can download it with nuget command : Install-Package CodeNode.Identity. Nuget will perform below changes in the solution :
- Add CodeNode.Identity dll to the project.
- Install all other required nuget packages.
- Add a empty connection string IdentityDBConnection in connection string section of configuration file. We have to update this with appropriate database information for our project. This is important as we follow code first approach with Entity Framework, which creates all required data tables in mentioned database on first interaction with database.
- Add a folder named Template at root, which contain some default email templates. These templates will be used to send email to user for different activities like email confirmation, activation and password reset. Content of these templates can be updated as per application needs. This folder contains following templates.
- EmailActivation.txt
- ResetPassword.txt
- AccountActivation.txt
- Add Startup.cs file at root. This file contain some default configuration for Identity system. We can change these settings as per our need. On a generic node, NET applications have only one Startup class, so this action may cause an error if we already have a Startup.cs file in the system, if this happens we need to resolve issues manually.
- Add below mentioned multiple configuration key-values in AppSetting section of web.config.
| Key Name | Description |
| SMTP | SMTP address for sending emails. |
| SMTPPort | SMTP port. |
| SMTPSender | Email of SMTP sender. |
| SMTPSenderPassword | SMTP password of email of SMTP sender |
| SenderDisplayName | Name which should be shown as sender. For e.g. : MyApp Support. |
| EnableSSL | True if need to enable SSL. |
| IsEmailBodyHtml | True if email has html body. This must be true if we have replaced added templates text with html. |
| AppName | Application name. This uses as additional entropy to enhance cryptographic security of the app. We must update this. |
| AppSecret | Any random string and it should not update after deployment. This help to enhance cryptographic security of the app. We must update this. |
| TokenLifeTimeInHr | Life time in hours for any custom token, other than access token. Such as e.g.: Account activation, reset password, email confirmation. |
| OAuthTokenLifeTimeInHr | Life time in hours of access token acquired by login. |
| AuthCookieLifeInHr | Life time in hours of authentication cookie, incase used with MVC or Web Forms application. |
| AuthCookieSlidingExpiration | The SlidingExpiration is set to true to instruct the middleware to re-issue a new cookie with a new expiration time any time it processes a request which is more than halfway through the expiration window. |
| ResetPasswordTemplatePath EmailConfirmationTemplatePath AccountActivationTemplatePath | File path for templates with email body. |
| ResetPasswordCallBackLink EmailConfirmationCallBackLink AccountActivationCallBackLink | These keys contains the address where user suppose to fall back when he will click on this link in the email. Application has to define three different end- points in client side (for e.g. angularJs client) application to receive it. |
| ResetPasswordMailSubject EmailConfirmationMailSubject AccountActivationMailSubject | These will hold the mail subject for corresponding emails. |
| ShouldLockOutAccount | Set it to true if user account should lock out after predefined attempts of failed login. |
| MaxFailedAccessAttemptsBeforeLockout | Number of failed login attempts after which account will be locked out. |
| DefaultAccountLockoutTimeSpanInMins | Time in minutes for which user account will be locked out. |
| AllowOnlyAlphanumericUserNames | Set to true if user name must be alphanumeric. |
| RequireUniqueEmail | Set to true if every user must have unique email. Usually it should be true. |
| EnableTwoFactorVerification | Set to true if two factor authentication is required. |
| TwoFactorHeaderName | HTTP header name which will contain one time code shared with user. |
Library Features
Library provides following important features.
1. Authentication
We can use several way to support authentication and authorization with the library.
1.1 Token
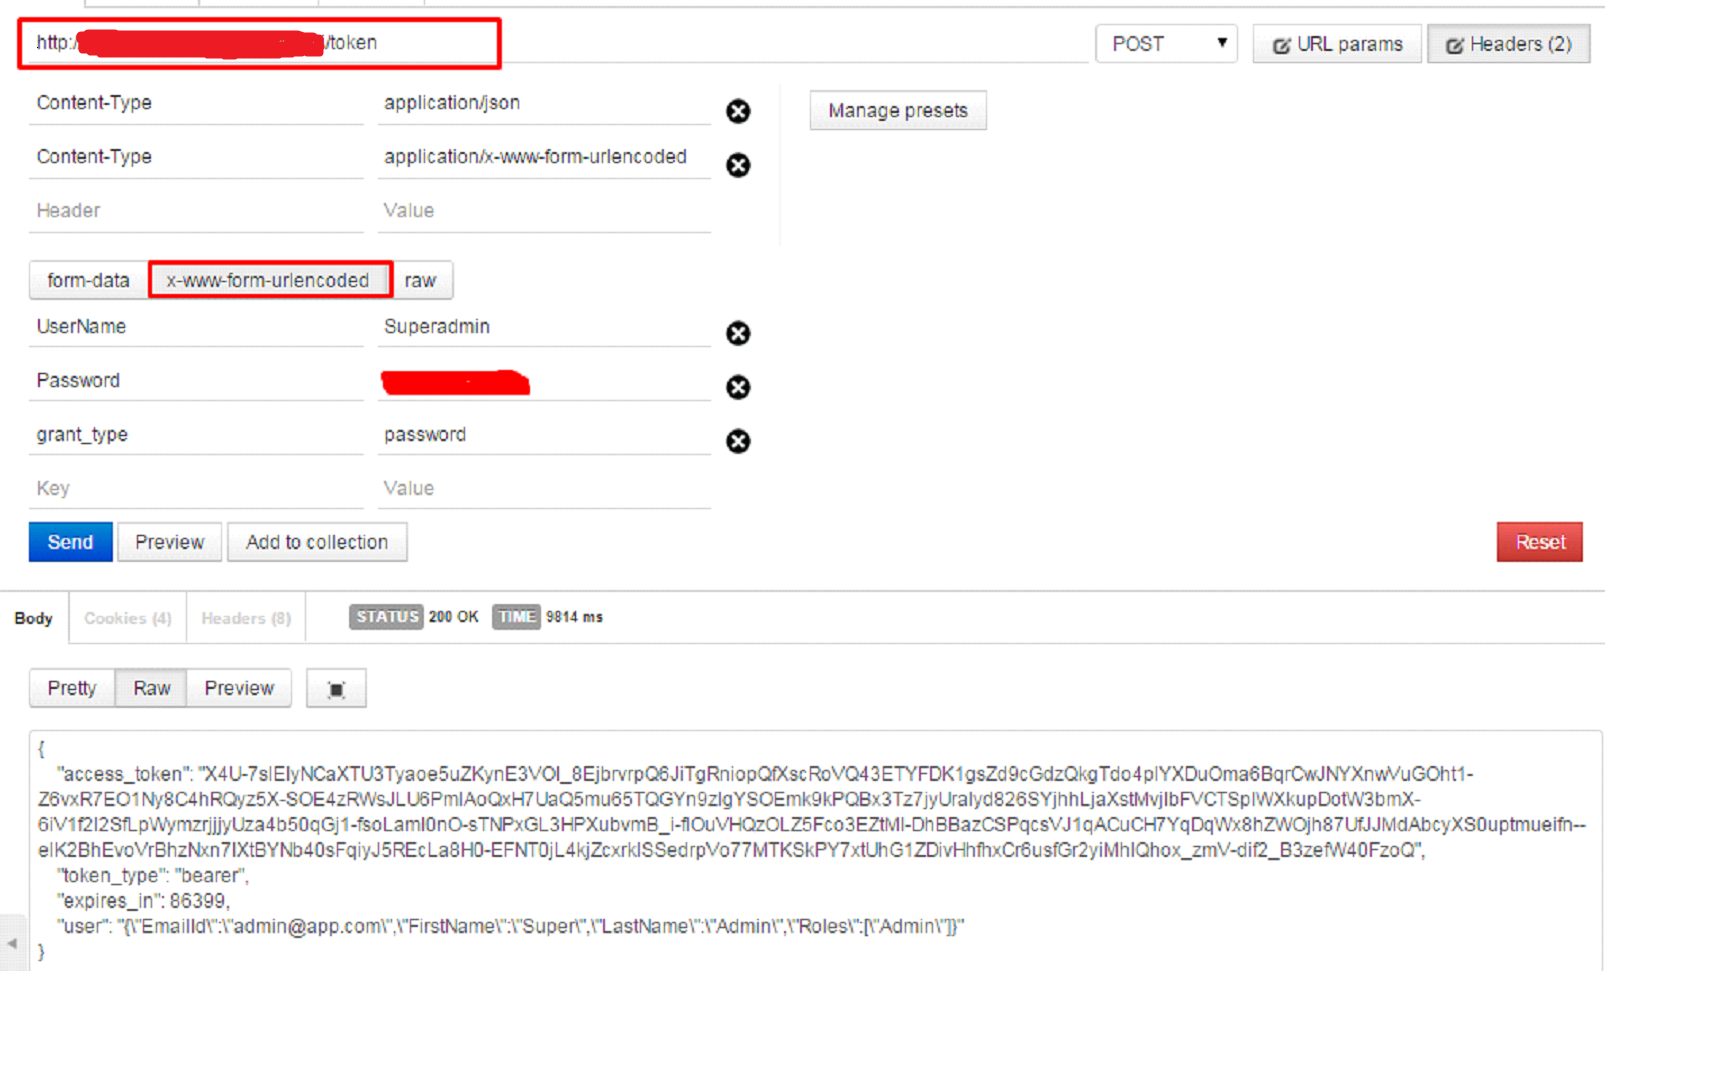
We normally use token based authentication/ authorization with REST API. By default we can get auth token by requesting “token” endpoint. We set this end-point in Startup.cs class and can be changed. We need to send request in below format with username and password.
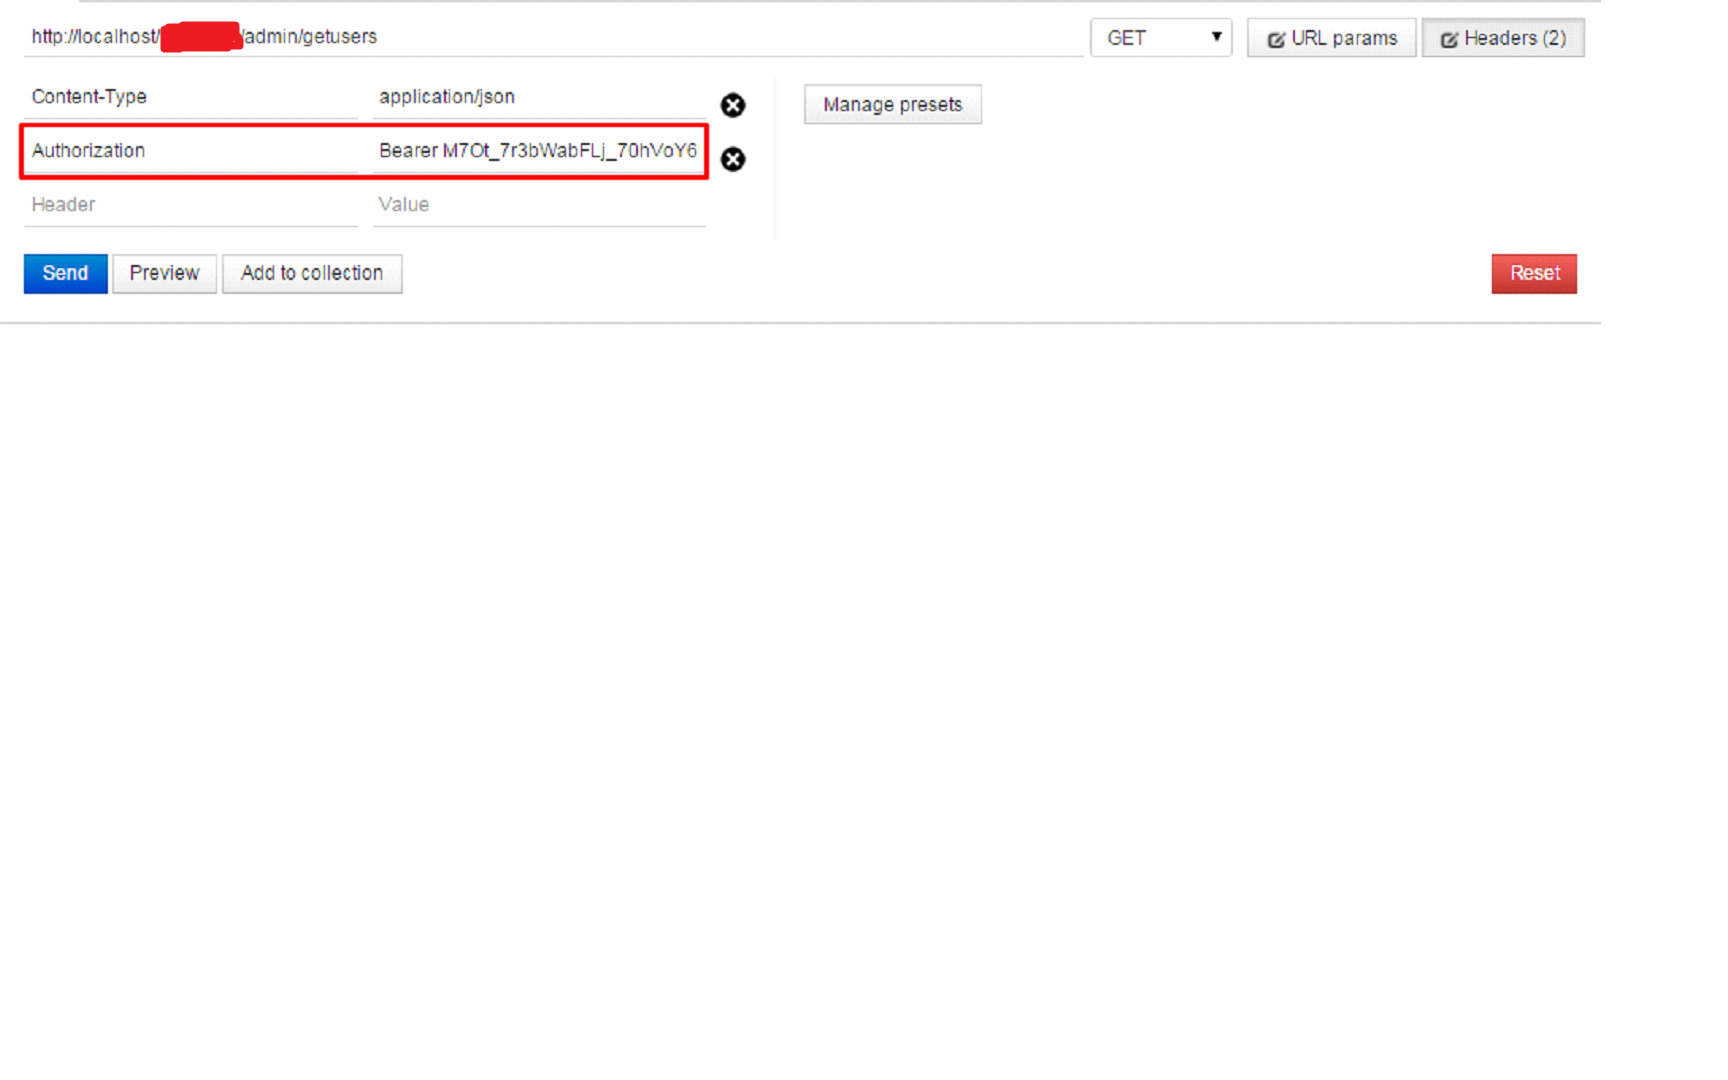
On success, “access_token” will be granted, which will be used in subsequent requests to grant appropriate access to user as Authorization header.
For authorization, API method should decorate with Authorize attribute with allowed role for the method.
1.2 Two Factor
Two factor means authentication based on an additional factor other than usual username and password. In this process after providing user credential, an email will be sent to user’s registered email and system would ask for the code and then verify it. If all information is good, access token will be granted. There is key “EnableTwoFactorVerification” in app settings. This key should be set to true to enable second factor authentication. Currently library supports to send one time code through email only, I will add SMS support in near future.
This process will be completed in two steps:
- Verify User Credential and Send One Time Code :
Save the user credential in temporary storage on client side and call an API method which will validate user credential. If credential are correct, invoke method SendTwoFactorCode to send one time code to user as suggested in below snippet.public HttpResponseMessage VerifyUserCredential(string userName, string password) { IdentityManager manager = new IdentityManager(); var result = manager.ValidateUserCredentials(userName, password); if (!result.IsSucceeded) return Request.CreateResponse(HttpStatusCode.BadRequest, result.Error); manager.SendTwoFactorCode(result.User.Id); return Request.CreateResponse(HttpStatusCode.OK); } - Send one time code along with already taken user credential :
User will be asked to enter received code. Now the process would be same as used in token approach but will an additional header contains one time code.
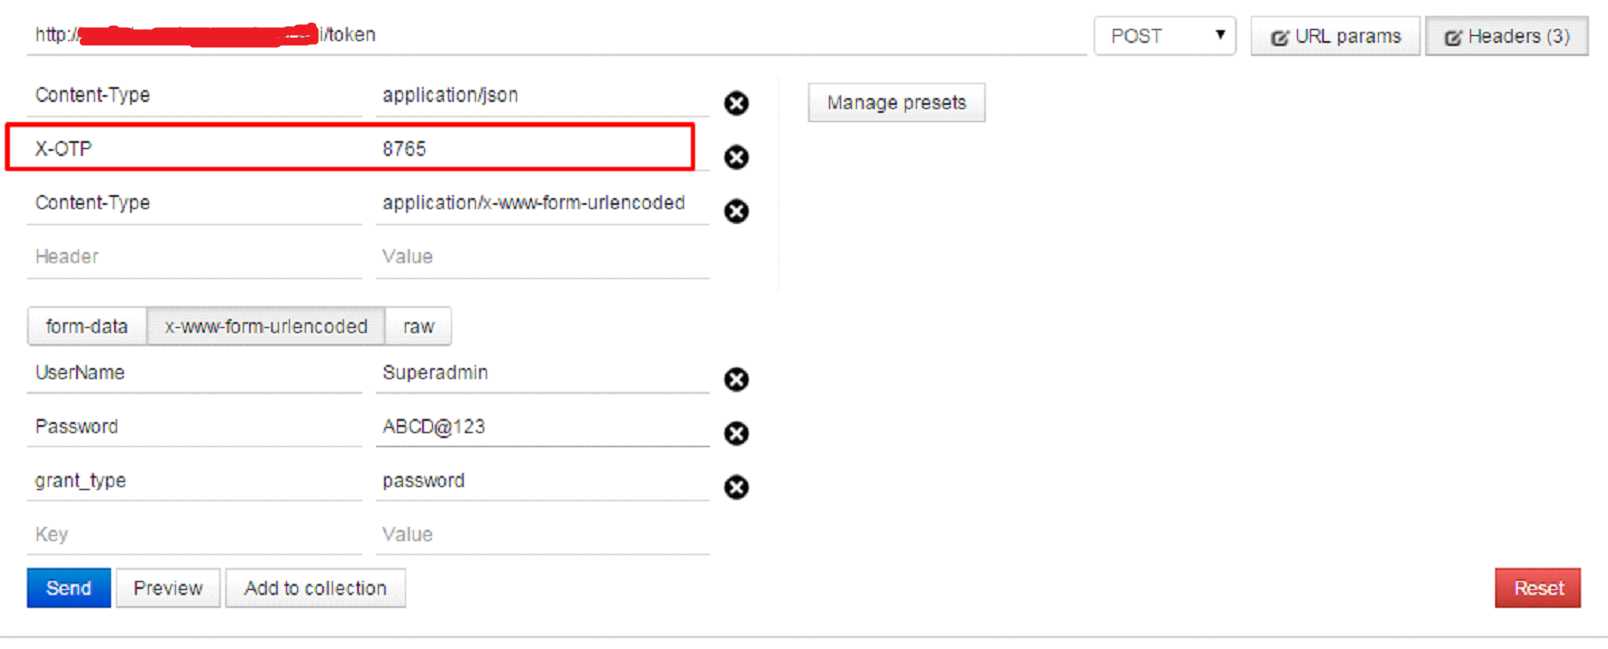
There is key “TwoFactorHeaderName” in app settings and we need to pre-defined header name in this key which we will used to pass this one time code to server. Default value of this header name is “X-OTP”. Now auth token will be provided if code will be correct. Suppose received code value is “8765”, then token request would be like:
1.3 Form or Cookie
Traditional cookie based authentication will be used in MVC or web forms application. Library exposes a method, which authenticate user credential and create authentication cookie to attach with request.
IdentityManager manager = new IdentityManager();
var result=manager.CookieSignIn(userName,password,false,HttpContext.Current.GetOwinContext());
result is SignInStatus enum and this contain result as states in below image.

2. User Management
We can manage complete user and role flow with the library, which include user and role creation and update, linking of user and roles and add these roles as claims in user auth token. I just referencing some of the functions, you can anytime dive into source code (link at ) .
2.1 User, Role Creation and Activation
To add new roles, we can use CreateRole, CreateRoles and UpdateRole methods. To add a user, call the CreateUser(TUser user, IList<string> UserRoles) method and pass the User object and the list of roles (if required) but these roles must be pre exist. Usually we put IsActive flag to false while create a new user and make it true when user come through account activation process but it all depends on application flow.
If we follow recommended flow, make IsActive flag is false. Then, call the SendEmailConfirmationMail(Guid userId) method by passing the user id of newly created user. User will receive an email with the activation link where he can set his new password. EmailActivation.txt content will be used to create email body with callback URL.
Once user will click on email confirmation link, process the user action and call ConfirmUserEmailAndSetPassword(string code, string token, string password) method and pass the code, token and password received from front end application. This method is responsible to activate user and set his first password.
2.2 Custom Activation
If application has some custom logic to deactivate user afterwards and wants user to reactivate through registered email, call SendUserAccountActivationMail(Guid userId, List<EmailBodyKeyValue> additionalKeyTextList = null) method. It will send an account activation mail to user. AccountActivation.txt file content will be used to create email body with callback URL. The callback URL should be mentioned in app.config key AccountActivationCallBackLink, library will add appropriate code and token for the user in this callback link. Once user click on activation link, call ActivateUserAccount(string code, string token) and pass the code and token received from front end application. This will activate user and now user can log into the application. If any user has IsActive = false, he can’t access the system as they will not be allowed to login.
2.3 Forgot Password
Forgot password process will send a password reset mail to registered email address. Call the SendPasswordResetMail(string userEmail) with the user email as the parameter. User will receive a mail with a link to reset password. ResetPassword.txt content will be used to create email body and callback URL should be mentioned in ResetPasswordCallBackLink. Once user will click on reset password link, call ResetPassword(string code, string token, string password) method and it will set user new password if password meet minimum complexity criteria.
3. Extension
I covered all minimun required features and configurations in first go but the same time we can extend some operations as per our requirements
3.1 IdentityConfigOptions
This is constructor parameter of IdentityManager. Although all options in IdentityConfigOptions have their default implementation implemented inIdentityManager but is case any application require their custom implementation of these functionality, it can be provided with IdentityConfigOptions through constructor of IdentityManager.
public class IdentityConfigOptions<TUser> where TUser : ApplicationUser, IUser<Guid>
    {
        public IIdentityValidator<string> PasswordValidator { get; set; }
        public IIdentityMessageService EmailService { get; set; }
        public DataProtectorTokenProvider<TUser, Guid> UserTokenProvider { get; set; }
        public Func<TUser, IEnumerable<string>> UserValidatorExtender;
    }
3.1.1 Password Validator
A new class which can either inherit from Microsoft.AspNet.Identity.PasswordValidator or direct implementation of IIdentityValidator<string> can be provided as password validator.
Default validation criteria is:
RequireDigit = true,
RequireLowercase = true,
RequireUppercase = true,
RequireNonLetterOrDigit = true,
RequiredLength = 8
3.1.2 Email Service
Default email service read SMTP related information through app settings. New email service can be provided through a class which is implementation of IIdentityMessageService.
3.1.3 User Token Provider
User token provider is used to encrypt and decrypt all security related stuff in the library e.g.: access token creation and validation. Default implementation uses machine key data protector. Machine key data protector uses default keys mentioned in machine.config file. If, we want, we can override them in our application web.config.
If application want to override default behavior, a new implementation of Microsoft.Owin.Security.DataProtection.IDataProtector would be passed in DataProtectorTokenProvider.
3.1.4 User Validator Extender
This extender can be used to add some more validation on user model. As described in 3.2, we can add additional properties in user model and the same time if we want to validate them through this, we can add validator extender for it.
        Func<MyAppUser, IEnumerable<string>> customValidator = (x) =>
        {

            var error = new List<string>();
            if (!x.Organization.Contains("ThoughtWorks"))
            {
                error.Add("User does not belong to ThoughtWorks.");
            }
            return error;
        };
This customValidator will be set in UserValidatorExtender and will be invoked when any user will added/ updated.
3.2 Extend User Model
As we use model first approach of entity framework and it creates all tables as per model structure on first time system interact with database. By default library declared some additional user properties in ApplicationUser.cs, which inherited from IdentityUser, as its model for user but if any application want some additional properties to be part of user table, can be achieved by creating new class with additional properties and use ApplicationUser as its base class. The new class need to be passed as type while creating IdentityManager object so that schema will be in sync. As code snippet shows, user table will contain two additional properties of LoginExpireOn and Organization.
  public class MyAppUser : ApplicationUser
    {
        public DateTime? LoginExpireOn { get; set; }
        public string Organization { get; set; }
    }
  var IdentityManager  = new IdentityManager<MyAppUser>();
MyAppUser also needed to provide as type in already added Startup class.
ConfigureOAuthSettings<MyAppUser>(app);
3.3 Claim Helper
User access token contain all allowed claims and we can retrieve these claims information when user use this token to get authorization. IdentityClaimsHelper has below helper methods to retrieve some generic information from user claims rather than from a database call.
- User ID : IdentityClaimsHelper.GetCurrentUserId();
- User Email : IdentityClaimsHelper.GetCurrentUserEmail();
- User Name : IdentityClaimsHelper.GetCurrentUserName();
- User Roles : IdentityClaimsHelper.GetCurrentUserRoles();
Things to do
- Add third party login support.
- Add second factor in cookie authentication.
- Include test cases.
- Once this version will be completed, migrate it to .NET CORE.
Nuget and source code links
Nuget link
Source code link


